지난 시간에 이어서 👇
iOS) UITableView 스토리보드 없이 코드 작성(programmatically) -1
커스텀 Cell을 이용하여
친구목록 TableView 를 만들어 보겠습니다.
우선 커스텀 셀을 파일을 생성해 줍니다.
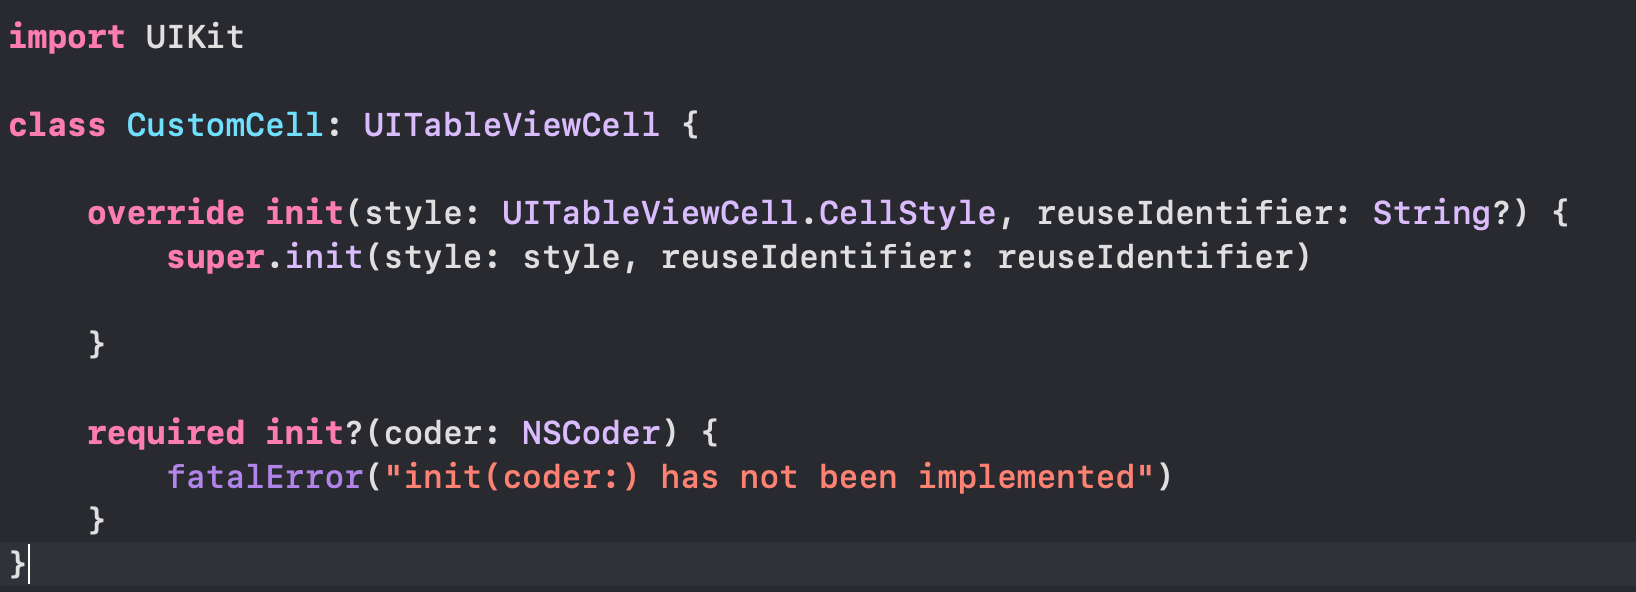
이렇게 초기에 위와 같은 코드들을 선언 해주는 이유는
스토리보드로 셀을 작성하게 될 경우 초기화를 해주기 때문에 안해줘도 되지만
코드로 작성하게 될 경우 작성해줘야 합니다.

그러면 이제 셀을 커스텀 해보도록 하겠습니다.
셀 ID를 선언
static let cellId = "CellId"
우선 셀에 들어갈 요소들을 선언하고
let profile = UIImageView()
let name = UILabel()
오토레이아웃을 선언 해줍니다.
func layout() {
        self.addSubview(profile)		// 1
        self.addSubview(name)			// 1


        // 2
        profile.translatesAutoresizingMaskIntoConstraints = false
        profile.leadingAnchor.constraint(equalTo: self.leadingAnchor, constant: 10).isActive = true
        profile.centerYAnchor.constraint(equalTo: self.centerYAnchor).isActive = true
        profile.widthAnchor.constraint(equalToConstant: 60).isActive = true
        profile.heightAnchor.constraint(equalToConstant: 60).isActive = true

        // 3
        name.translatesAutoresizingMaskIntoConstraints = false
        name.leadingAnchor.constraint(equalTo: profile.trailingAnchor, constant: 10).isActive = true
        name.centerYAnchor.constraint(equalTo: self.centerYAnchor).isActive = true
    }
위 코드를 해석을 해보겠습니다.
1. 위에서 선언한 두 요소를 뷰에 addSubview 해줍니다.
2. 우선 뷰의 leadingAnchor로 부터 10pt 간격
2-1 . centerYAnchor를 통해 이미지가 뷰의 Y축 가운데에 놓이도록 설정
2-2. 가로 세로 크기 60 고정
3. profile 의 trailingAnchor로 부터 10pt 간격
3-1. centerYAnchor를 통해 이미지가 뷰의 Y축 가운데에 놓이도록 설정
자세한 오토레이아웃 설정은 다음 시간에 따로 준비하도록 하겠습니다.
자 이렇게 되면 셀이라는 하나의 요소의 규격 정했다고 생각하면 됩니다.
그 안에 들어갈 요소들의 위치를 규격화 해준것이죠!!
그리고 layout( ) 함수를 위와 초기화 되도록 해줍니다.
이번에는 User의 프로필을 결정할 데이터 셋을 다음과 같이 설정합니다.

그리고 여러분들이 원하는 사진을 Assets에 넣어줍니다.

이번에 다시 저번시간에 만든 ViewController로 돌아가서
삽입할 테이터를 임시로 선언 합니다.

그리고 register를 통해 내가 어떤 셀을 사용하겠다!! 라고 등록하는 과정을 거칩니다.

다음과 같이 해당 함수를 입맛에 따라서 구현 합니다.

첫번째 함수에 나타낼 섹션의 갯수를 임시 데이터의 배열 갯수를 통해 리턴합니다.
두번째 위에서 등록한 커스텀 셀을 다음과 같이 cell 변수에 담아서 해당 indexPath.row 를 통해 값을 선언해 줍니다.
그리고 마지막으로
아까 커스템 셀에서 이미지의 크기를 60x60으로 해주었으니
tableView.rowHeight = 100 정도로 선언해 주겠습니다.
자 이제 실행을 해보면??

키야 다음과 같이 나옵니다.
끝!!
ViewController 전체코드
import UIKit

class ViewController: UIViewController {

    let user: [User] = [User(profile: UIImage(named: "송민호")!, name: "송민호"),
                        User(profile: UIImage(named: "박재범")!, name: "박재범"),
                        User(profile: UIImage(named: "이하이")!, name: "이하이"),
                        User(profile: UIImage(named: "제니")!, name: "제니"),
                        User(profile: UIImage(named: "아이유")!, name: "아이유") ]

    let tableView: UITableView = {
        let tableView = UITableView()
        tableView.rowHeight = 100
        return tableView
    }()

    override func viewDidLoad() {
        super.viewDidLoad()
        attribute()
        setTable()
    }

    func attribute() {
        tableView.register(CustomCell.self, forCellReuseIdentifier: CustomCell.cellId)
        tableView.delegate = self
        tableView.dataSource = self
    }

    func setTable(){
        view.addSubview(tableView)
        tableView.translatesAutoresizingMaskIntoConstraints = false
        tableView.topAnchor.constraint(equalTo: view.safeAreaLayoutGuide.topAnchor).isActive = true
        tableView.bottomAnchor.constraint(equalTo: view.safeAreaLayoutGuide.bottomAnchor).isActive = true
        tableView.leadingAnchor.constraint(equalTo: view.safeAreaLayoutGuide.leadingAnchor).isActive = true
        tableView.trailingAnchor.constraint(equalTo: view.safeAreaLayoutGuide.trailingAnchor).isActive = true
    }
}

extension ViewController:  UITableViewDataSource, UITableViewDelegate {
    func tableView(_ tableView: UITableView, numberOfRowsInSection section: Int) -> Int {
        return user.count
    }

    func tableView(_ tableView: UITableView, cellForRowAt indexPath: IndexPath) -> UITableViewCell {
        let cell = tableView.dequeueReusableCell(withIdentifier: CustomCell.cellId, for: indexPath) as! CustomCell

        cell.profile.image = user[indexPath.row].profile
        cell.name.text = user[indexPath.row].name

        return cell
    }
}
'iOS' 카테고리의 다른 글
| iOS ) Custom Font 적용하기 (0) | 2020.11.25 |
|---|---|
| iOS) UITableView 스토리보드 없이 코드 작성(programmatically) (0) | 2020.09.20 |

